

How to Make Your Own Autumn Wreath with Natural Materials
Creating a wreath is an opportunity to bring a unique touch to your home décor.
Did you know that wreaths have been used for thousands of years as symbols of victory, celebration, and hospitality? Creating a wreath from natural materials is not only a way to honor this tradition but also an opportunity to bring a unique and personal touch to your home décor. Crafting an autumn wreath, in particular, allows you to harness the rich colors, textures, and scents of the season, transforming simple natural elements into a stunning piece of art.
Gathering Your Materials: The Foundation of Your Wreath
The first step in making an autumn wreath is collecting the right natural materials. While store-bought wreath bases are convenient, using natural materials can deepen the connection to the craft and the season.
Wreath Base Options
- Vine or Grapevine: These bases are flexible and rustic, complementing natural foliage beautifully.
- Willow or Birch Twig: For a lighter, more delicate structure.
- Wire Frame with Moss: If you prefer a sturdier base, a wire frame wrapped with moss can provide a natural look.
Natural Elements to Collect
- Leaves: Maple, oak, and beech leaves offer rich hues of red, orange, and yellow. Dry them flat between books to preserve their shape.
- Pinecones and Acorns: These add texture and earth tones.
- Berries: Holly, crabapple, and rose hips bring pops of color and contrast.
- Seed Pods and Nuts: For visual interest and a variety of shapes.
- Dried Flowers and Grasses: Such as wheat, lavender, or pampas grass, which add softness and height.
When selecting materials, consider the longevity of each item. For example, fresh leaves may wilt quickly, so dried leaves or preserved foliage might be preferable for a wreath that lasts several weeks.
Designing Your Wreath: Balancing Color, Texture, and Form
A well-designed wreath balances various elements to create visual harmony. Start by deciding on a color palette. Autumn offers a natural spectrum from deep reds and burnt oranges to muted browns and golden yellows.
Tips for Design
- Start with a Base Layer: Attach larger leaves or greenery around your wreath base using floral wire or hot glue. This creates a full foundation.
- Add Focal Points: Group clusters of pinecones, berries, or seed pods in small bunches spaced evenly or asymmetrically for a natural look.
- Incorporate Texture: Mix smooth leaves with rough pinecones and soft grasses to keep the eye engaged.
- Consider Shape: While a circular wreath is traditional, don’t hesitate to experiment with oval or irregular shapes for a modern twist.
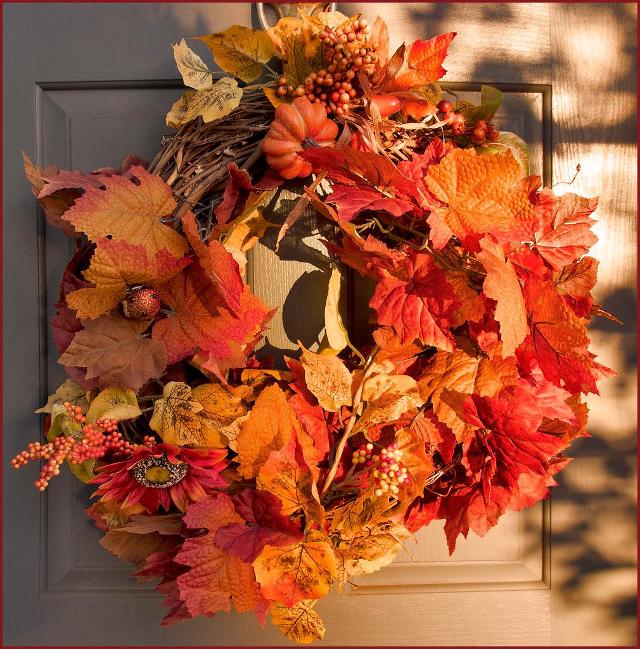
An example of a successful design is using a grapevine base covered with a mix of dried maple leaves and clusters of bright red rose hips, accented by small pinecones. This combination offers vibrant color contrast, varied textures, and a traditional autumn feel.
Assembling Your Wreath: Step-by-Step Guide
Once your materials and design are ready, it’s time to assemble.
- Prepare Your Workspace: Lay down newspaper or craft paper to protect surfaces. Have scissors, floral wire, and a hot glue gun on hand.
- Attach Base Layer: Secure the largest leaves or greenery to the wreath base with floral wire, overlapping slightly to create fullness.
- Add Decorative Elements: Use hot glue or wire to affix pinecones, berries, and seed pods. For heavier items like pinecones, wire is more secure.
- Fill in Gaps: Use smaller leaves, dried flowers, or grasses to fill any empty spaces, ensuring a balanced look.
- Create a Hanging Loop: Attach a loop of twine or ribbon at the top of the wreath for easy hanging.
Throughout the process, step back periodically to view the wreath from a distance. This helps maintain balance and catch any areas needing adjustment.
Preserving Your Autumn Wreath for Longevity
Natural materials can be fragile, so taking steps to preserve your wreath will extend its beauty.
- Avoid Direct Sunlight: Prolonged exposure can fade colors.
- Keep Away from Moisture: Humidity can cause mold or deterioration; display in a dry area.
- Use a Protective Spray: A light coat of clear craft sealant or hairspray can help preserve leaves and flowers.
- Store Properly: When not in use, store the wreath in a cool, dry place inside a box to prevent crushing.
Practical Tips for a Successful Project
- Collect Materials Early: Gather natural items while they are still fresh to ensure better preservation.
- Mix Natural and Artificial: Incorporate faux elements like silk berries or leaves to add durability without sacrificing natural beauty.
- Personalize Your Wreath: Add unique touches such as cinnamon sticks for scent or a handmade bow for a personal flair.
- Work in Layers: Building your wreath gradually ensures a more cohesive and intricate design.
- Use Quality Tools: Invest in floral wire cutters and a reliable glue gun for ease and precision.
The Enduring Appeal of Handmade Autumn Wreaths
Creating your own autumn wreath is more than a decorative endeavor; it is a creative process that connects you with nature and tradition. By selecting and assembling natural materials thoughtfully, you craft a piece that is both visually appealing and meaningful. Whether displayed on a front door, interior wall, or as a centerpiece, a handmade autumn wreath brings warmth and character to any space. Embracing this craft invites a deeper appreciation of the season’s textures and hues, making your home not just decorated, but truly adorned.
More like this:


- Most Popular


- Top Stories


- Most Recent


- Sign In
- Home
- Video
- News
-
Weather
 Sponsored by Michael Ryan Exteriors - Roofing Professionals
 - Sports
- Obits
- Events
- Radio
- AP News
- Shop Local
- Classifieds
- Autos
- Real Estate
- Directory
Follow Us
Copyright © 2026 RiverBender.com All rights reserved.
primary